Easy Amish Small Loaf Sandwich Bread Recipe
No mixer is needed for this small loaf of perfect white bread recipe. Most homemade bread recipes require a mixer of some type, but this easy bread recipe for one loaf is simple to make in small batches without using an electric mixer. I decided to pay homage to the Amish and use good old arm power.
Another classically easy recipe is a Ciabatta bread rolls recipe, so easy!
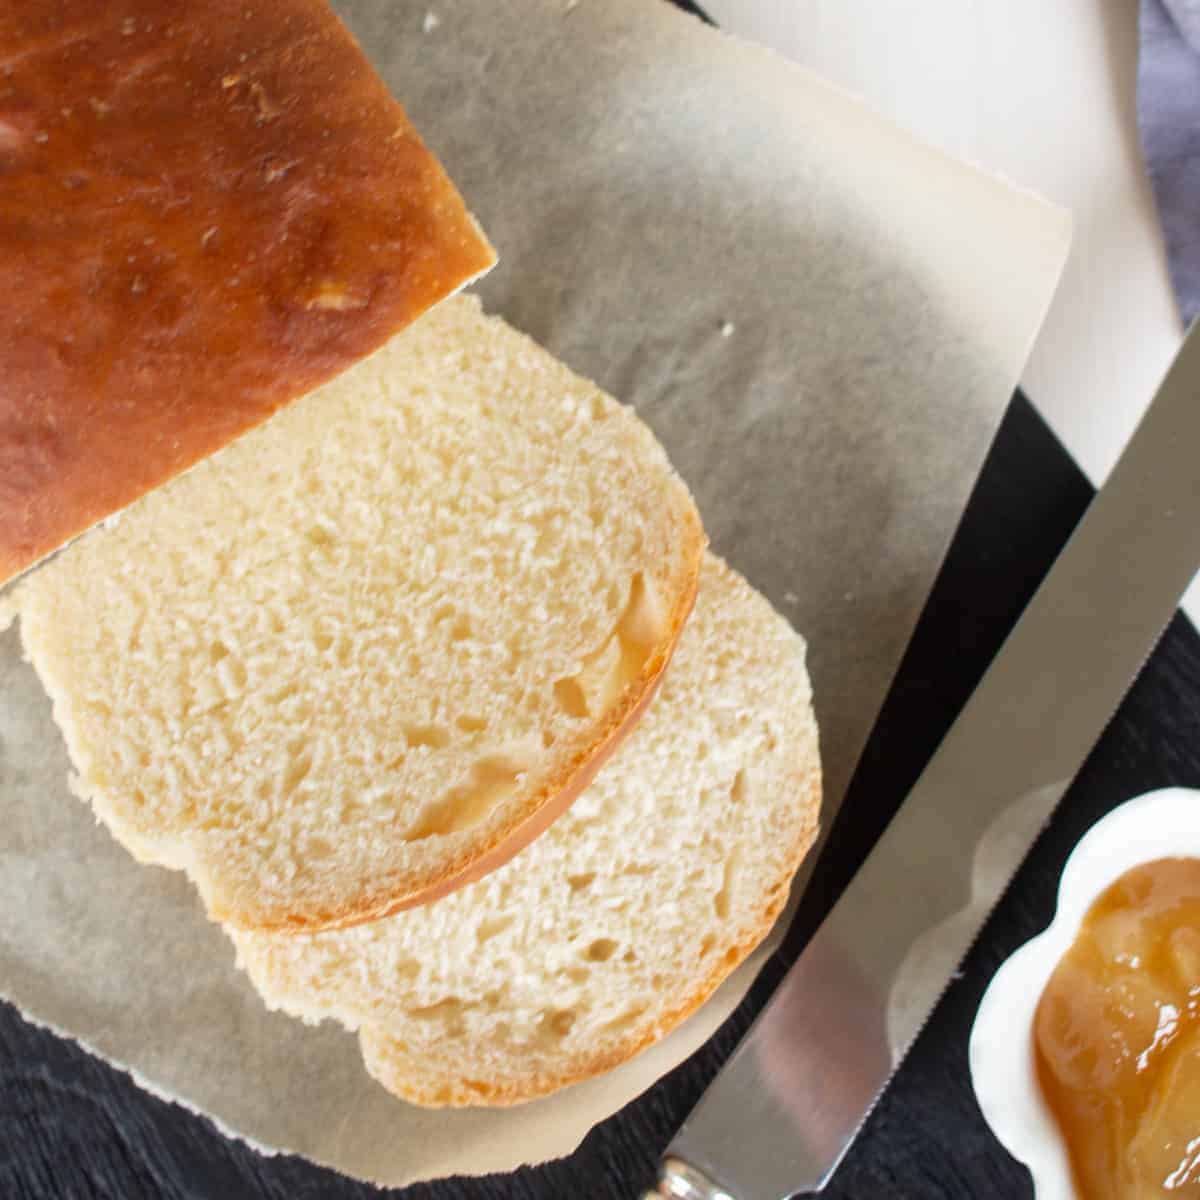
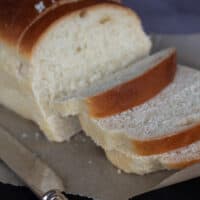
Makes one small batch bread recipe with a slightly crispy crust and is great sandwich bread and especially good with a simple grilled cheese sandwich!. As long as you are making your own bread you might try making these homemade bread and butter pickles. And don’t forget how good homemade peanut butter is spread on fresh bread.
Click the recipe link at the top of the page to go straight to the printable recipe card which includes ingredient amounts with a detailed ingredient list, instructions, and recipe notes. You can also scroll through the post for helpful tips and step-by-step instructions. The recipe card is located at the bottom of the post.
Why this recipe works
This tasty Amish bread recipe doesn’t require a stand mixer, dough hook, or any special equipment. It makes just one loaf of delicious bread. If you want a second loaf you can double the recipe.
The beauty and lure of this easy bread recipe are in its simplicity. Simple ingredients, a couple of bowls, measuring spoons, a dough whisk or wooden spoon, and a board is all you need. The first time I made this bread it came out perfect! I have to label this bread as a nearly no-fail bread recipe.
Amish White Bread is the best bread recipe to hook you on bread making.
With a hint of sweetness, this bread is perfect for morning toast slathered with homemade strawberry rhubarb jam or in thick bread slices for weekend french toast for one topped with a fresh blackberry sauce. Move over store-bought bread!
Ingredients and Substitutions
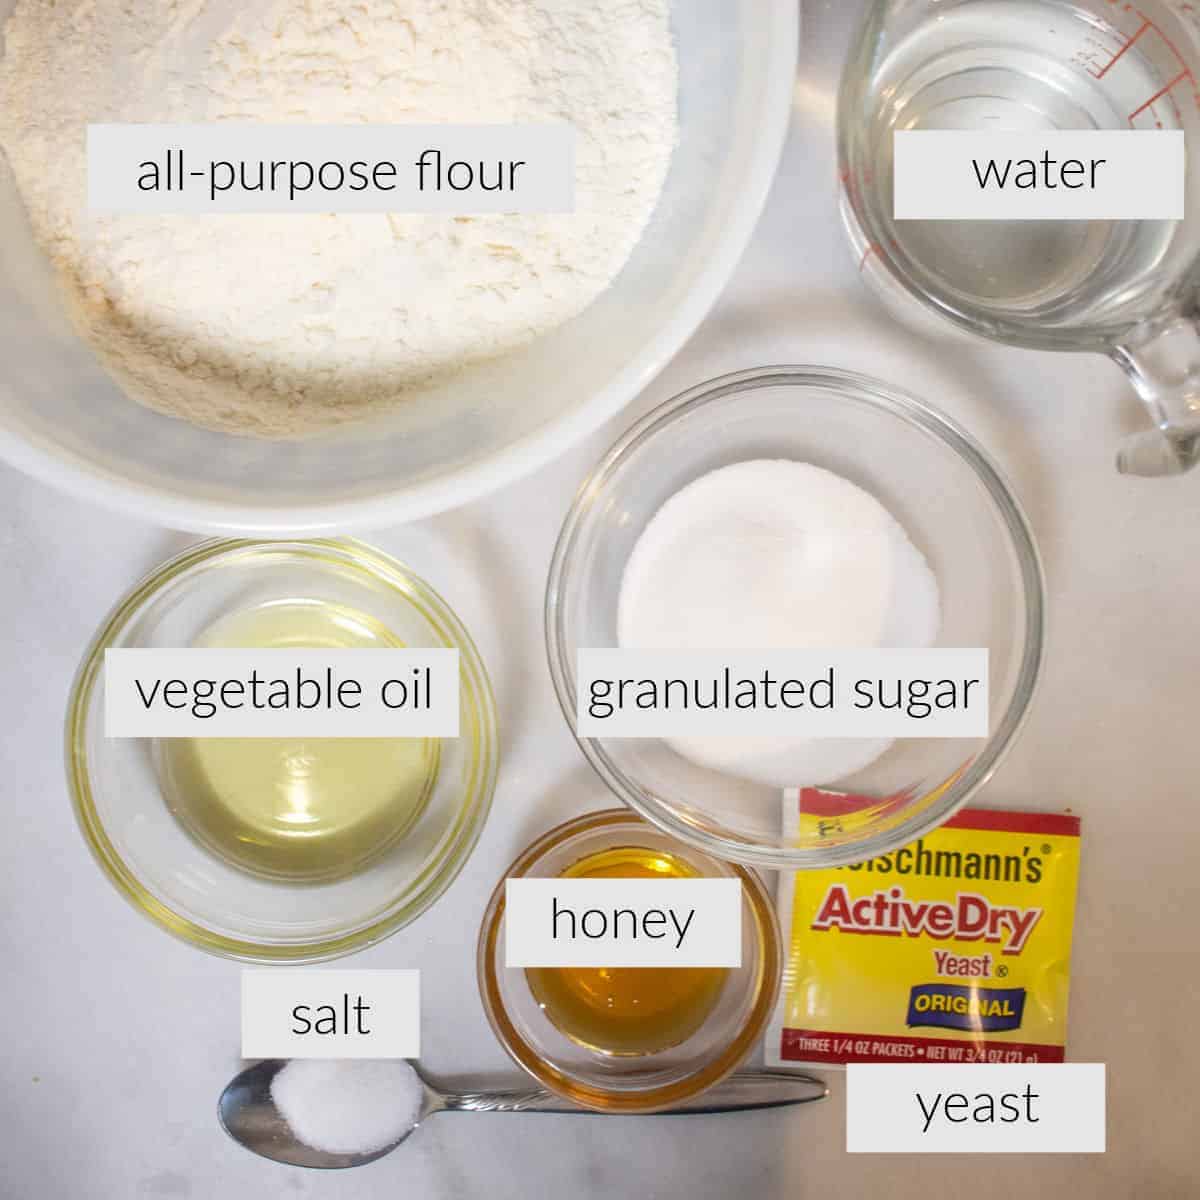
- Sugar and Honey – I like using a mix of the two however, you can substitute one or the other. For sweeter bread, adjust the amount of sweetener to fit your taste.
- Water – Use only warm water otherwise, the sugar and yeast won’t dissolve properly.
- Active Dry Yeast – Use fresh yeast packets that are available in the baking section of the grocery store. I have not used rapid rise yeast or instant yeast for this recipe, however I have used for other bread recipes and it works great. I’ve always used either Fleishmanns or Red Star Yeast, both are widely available in the grocery stores.
- Kosher Salt – use fine kosher salt, I don’t recommend using regular table salt as I think it imparts a weird taste, or maybe it’s just me, but consider yourself warmed.
- Vegetable Oil – use a flavor-neutral oil like Canola or Mazola. You can use an olive oil but the crust will be softer.
- All-Purpose Flour -For best results, don’t use bread flour, this recipe works best with standard all-purpose white flour.
- Butter – optional ingredient to brush on bread crust.
Recipe Directions
A printable recipe card with detailed instructions and ingredients is at the bottom of this post.
Pay extra attention to step 3.
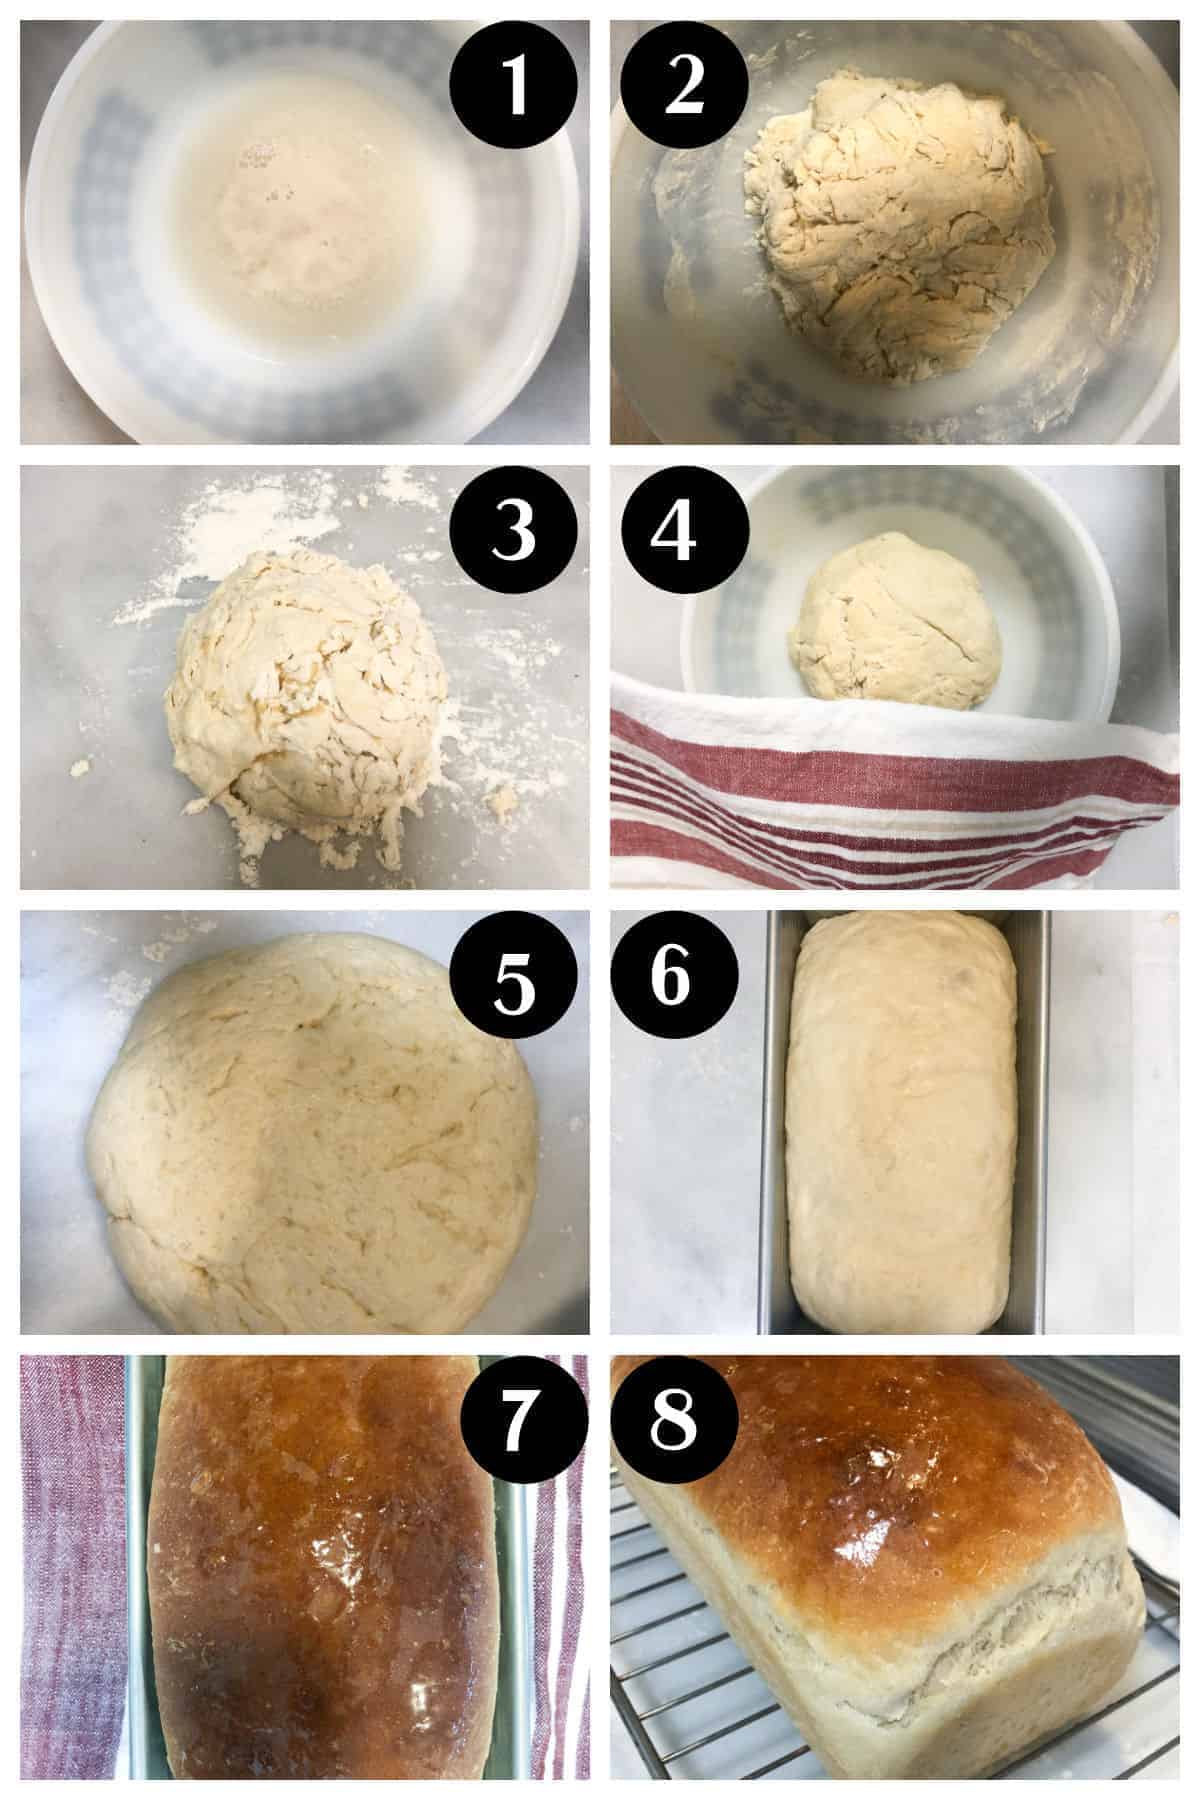
- In a medium bowl dissolve the sugar in warm water. Once dissolved stir in the yeast. Let sit for about 5 minutes while it proofs or gets a little foamy and it will form little air bubbles.
- Add the oil to the yeast mixture and stir. Add the salt and mix in the flour, one cup at a time. Stir with a wooden spoon sourdough whisk until a dough ball forms. You could use a mixer with a dough hook attachment but mixing by hand is relaxing.
- Place the dough on a lightly floured pastry board and knead until the dough is smooth and elastic about 2-3 minutes; the dough should bounce back when poked. The dough kneading process is how the gluten is formed that will make your bread soft, light, and airy so give this process the proper attention. When the dough isn’t kneaded enough, your finished product won’t rise properly, it’s kneaded too much, the bread will be tough and chewy. I’ve highlighted this step because it really is where you will make or break your bread (pun intended).
- Lightly coat the inside of a glass or stainless steel large bowl with cooking spray or oil Place the dough in the bowl, turning to coat all sides of the dough ball. Cover with a damp cloth and let sit in a warm place for 1 hour. The dough will rise in almost any container but stainless steel or plastic retains heat best. For my recipe, I’m using glass because, make sure to oil the sides of the bowl.
- Remove the dough from the bowl and punch down. Shape the dough into a loaf shape. Place in a prepared loaf pan, let sit, and for a 2nd rise for another hour. Don’t rush the rise times.
- Bake in 350° F oven for 30 minutes. The crust will be golden brown. The internal temperature of fully baked bread is 190° F. You can check by placing an instant-read thermometer poked into the side of the loaf.
- Remove from the oven and brush the top of the bread crust with butter. Let cool for 5 minutes.
- Remove from the loaf pan and continue cooling on a wire rack.
Tip for proofing dough
The optimal temperature for the dough to rise is between 75-78 °F. When proofing dough I preheat my countertop oven at about 120 degrees and place the dough bowl on a warm work surface on top of the oven. A little bit of heat radiates up but won’t get too hot.
Tools needed to bake Amish White Bread
My recipe version does not use any mixer and is very easy to make with the simple tools listed below. Using a stand mixer will give you that smoother dough but I found it doesn’t really make any flavor difference.
- Mixing Bowls – you can use almost any bowl or if you plan on making bread regularly try a proofing bowl.
- Wooden Spoon or Dough Whisk – A wooden spoon is really the workhorse of the kitchen and if you have one then most of the time you don’t need a mixer, especially when making small batch dough. A dough whisk is also handy if you mix a lot of batters and dough.
- Standard loaf pan – No need for any special bread pan, I recommend the 1-pound loaf bread pan (←affiliate link) from USA Pan. A wide selection is available on Amazon.
- Measuring Cups
- Measuring Spoons
How to store leftovers
Store in a linen bread bag or wrapped in a linen napkin and place in a paper bag. The bread is best stored unsliced and should stay fresh for up to 3 days. If you don’t think you will use the bread up in a couple of days then you can wrap the dry cooled bread in plastic wrap and freeze it for a month.
FAQ’s
Punching down will deflate the dough and release the air so that you can properly knead the dough and form it into a loaf.
The bread is still baking while it’s cooling so let it cool down completely before cutting. The other reason is that you simply underbaked the bread.
The perfectly baked sandwich white bread will be fully baked at an internal temperature of 190°F, the easiest way to check it is to use a thermometer. Avoid under-baked bread and get an instant-read thermometer.
Did you make this recipe? I would love it if you left a comment or review! Be sure to sign up for the email list and follow “A Weekend Cook” on Pinterest and my Facebook page.
Amish White Bread
Ingredients
- 1 cup warm water
- 3 tablespoon sugar
- 1 teaspoon instant active dry yeast
- ¾ teaspoons kosher salt
- 2 tablespoons vegetable oil
- 1 tablespoon honey optional
- 3 cups all-purpose flour
- 1 teaspoon butter
Instructions
- In a medium bowl dissolve the sugar in warm water. Once dissolved stir in the yeast. Let sit for about 5 minutes while it proofs or gets a little foamy.
- Add the oil ( and honey if using) and stir. Add the salt and mix in the flour, one cup at a time. Stir with a wooden spoon or dough whisk until the dough ball forms.
- Place the dough on a lightly floured pastry board and knead until the dough is smooth about 2-3 minutes.
- Lightly spray the inside of a glass bowl with oil and place the dough in the bowl, turning to coat all sides of dough ball. Cover with a warm damp cloth and let sit for 1 hour. The dough will rise to about double in size.
- Remove dough from the bowl and punch down. Shape the dough into a loaf shape and place inside a lightly oiled loaf pan and let sit and rise for another 40-45 minutes.
- Bake in 350° F oven for 30 minutes. The crust will turn a golden brown.
- Remove from oven and brush the top of the bread crust with butter. Let cool for 5 minutes.
- Remove from loaf pan and continue cooling on a wire rack.
This recipe was so good! My husband made a grilled cheese sandwich and said the bread was so flavorful, it was the best grilled cheese he ever had.
made today..perfect…
What is the honey in the list of ingredients used for? I didn’t see it in the instructions.
Hi Susanne,
The honey is optional, I updated the card to indicate that if used you should add it in at step 2. Thank you for asking!