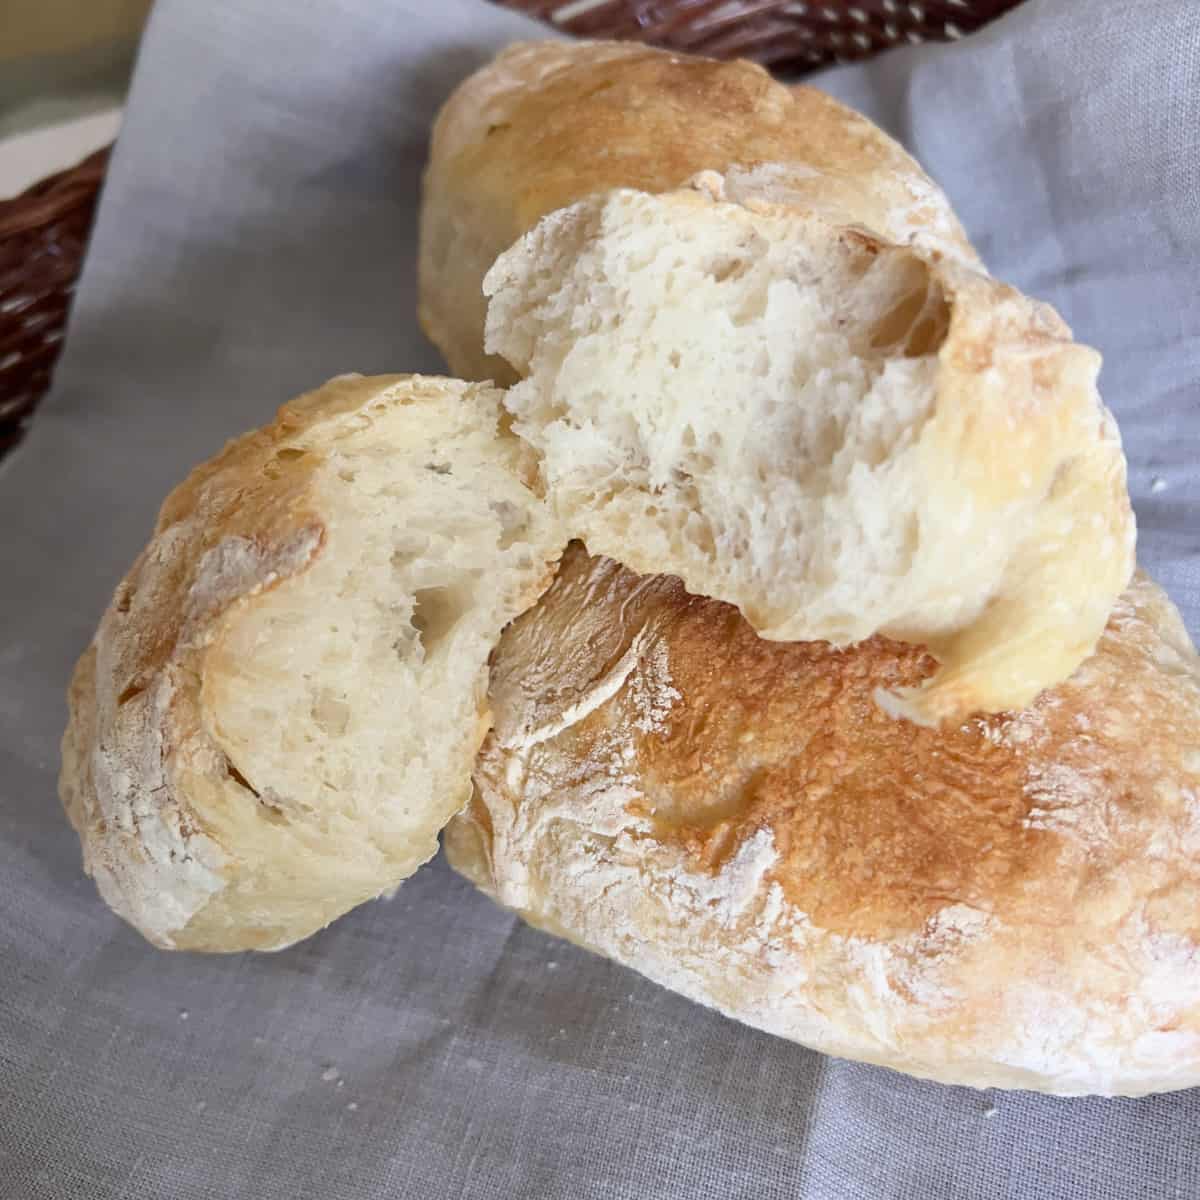
If you want to feel like an amazing bread maker, these Ciabatta bread rolls are for you. A very forgiving dough using a stretch and fold method that results in soft, tender rolls, truly the easiest no-knead recipe for Ciabatta bread you can make. A great recipe for the first time bread baker.
For a morning treat, these rolls are delicious when lightly toasted with a little homemade strawberry rhubarb jam. For lunch, slice lengthwise and fill with sweet and spicy meatballs or serve at dinner with this creamy lemon ricotta pasta. Other easy bread recipes include this amazing olive bread made in a bread machine and an easy white sandwich bread recipe.
Click the recipe link above to go straight to the printable recipe card which includes ingredients, instructions and notes. Scroll through the post for helpful tips and step-by-step instructions with photos.
Would you like to save this recipe?
3 Reasons to Make This Recipe
- Simple ingredients you probably already have in your pantry.
- Versatile recipe with many flavor variations.
- With a simple stretch and fold dough process this recipe is perfect for the first-time bread baker.
Key Ingredients Notes
How flour, water, salt, and yeast can create such tasty fresh bread is magical.
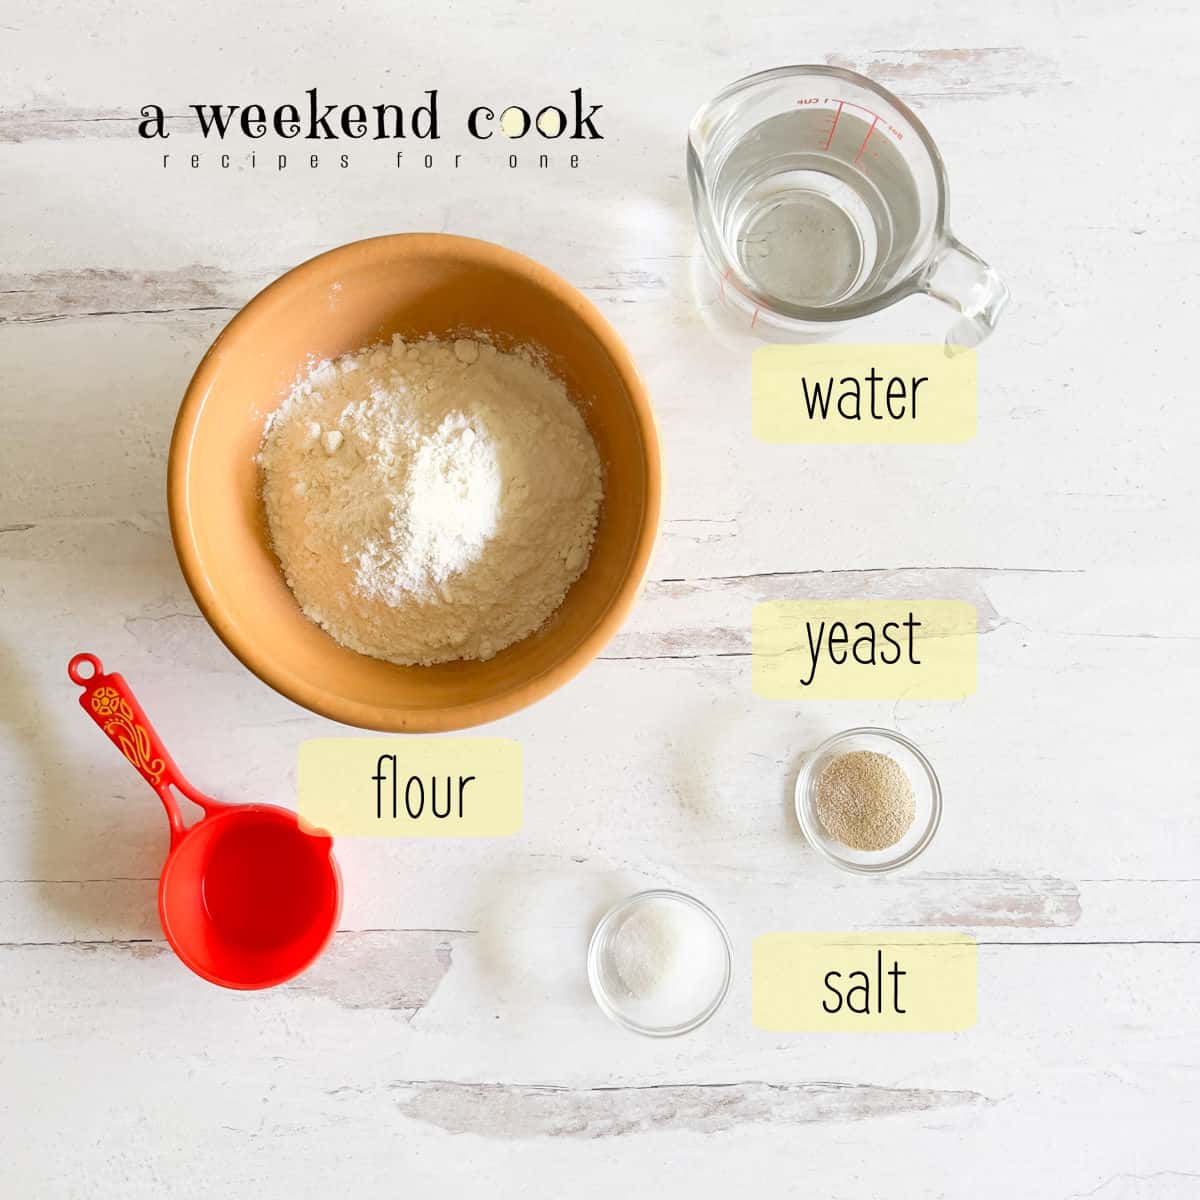
- Flour: I’ve only made this recipe with Bread flour which has a higher protein content. If you use all-purpose flour for rustic bread like ciabatta, you might miss the extra chewiness from the bread flour.
- Salt: I’ve used kosher salt and regular table salt, and both worked fine.
- Yeast: This recipe calls for instant dried yeast. Instant yeast does not need proofing and is very easy to work with. If you use an active dry yeast instead of instant then you will need to proof the yeast in a little warm water.
Ciabatta Recipe Variations
When adding additional ingredients to your dough, ensure they’re evenly distributed for the best result.
- Garlic and Rosemary Ciabatta Rolls: Before baking the rolls, brush the tops with a mixture of melted butter, minced garlic, and chopped rosemary. The flavor will bake into the rolls, creating a savory delight.
- Sundried Tomato and Olive Ciabatta Rolls: Add chopped sundried tomatoes and Kalamata olives to the dough for a Mediterranean twist. This is my favorite and I make these when cooking up my slow cooker version of Marinara sauce.
- Cheese Ciabatta Rolls: Add shredded cheese such as sharp cheddar or gruyere to the dough. You can also sprinkle some on top of the rolls before baking.
- Herb Ciabatta Rolls: Add a mix of your favorite chopped fresh herbs such as thyme, parsley, and oregano to the dough. This works especially well with olive oil-infused dough.
- Onion Ciabatta Rolls: Sauté onions until caramelized and add them to your dough for a sweet and savory spin.
When adding extras to ciabatta dough, they are usually incorporated during the initial mixing stage or after the first rise, when the dough is folded.
Recipe Directions
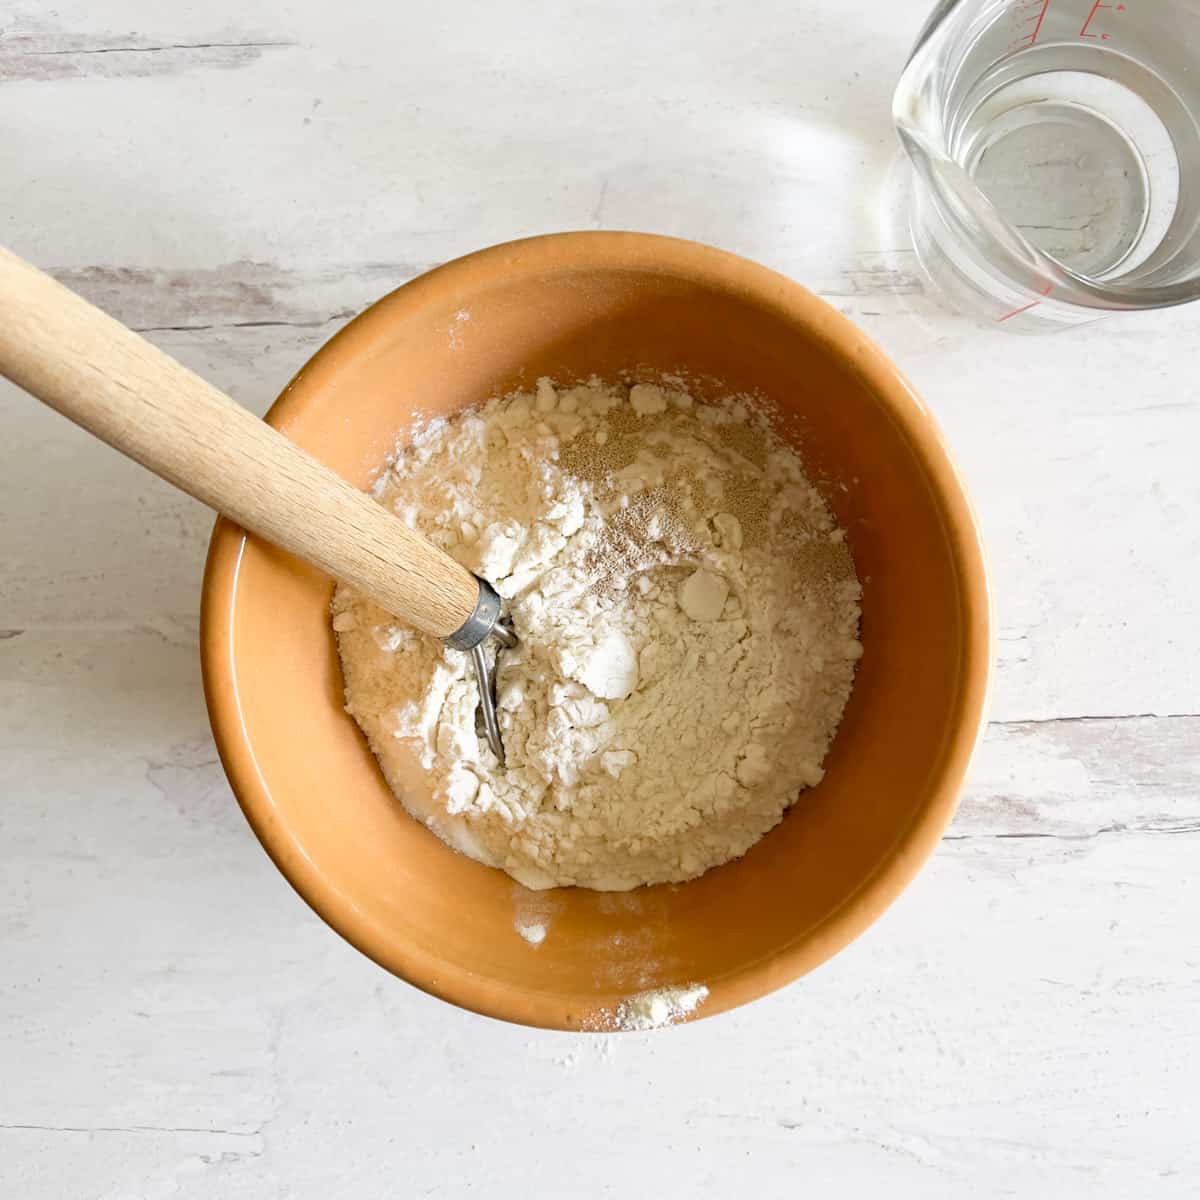
Step 1: Mix the dry ingredients with a dough whisk or a wooden spoon in a medium bowl.
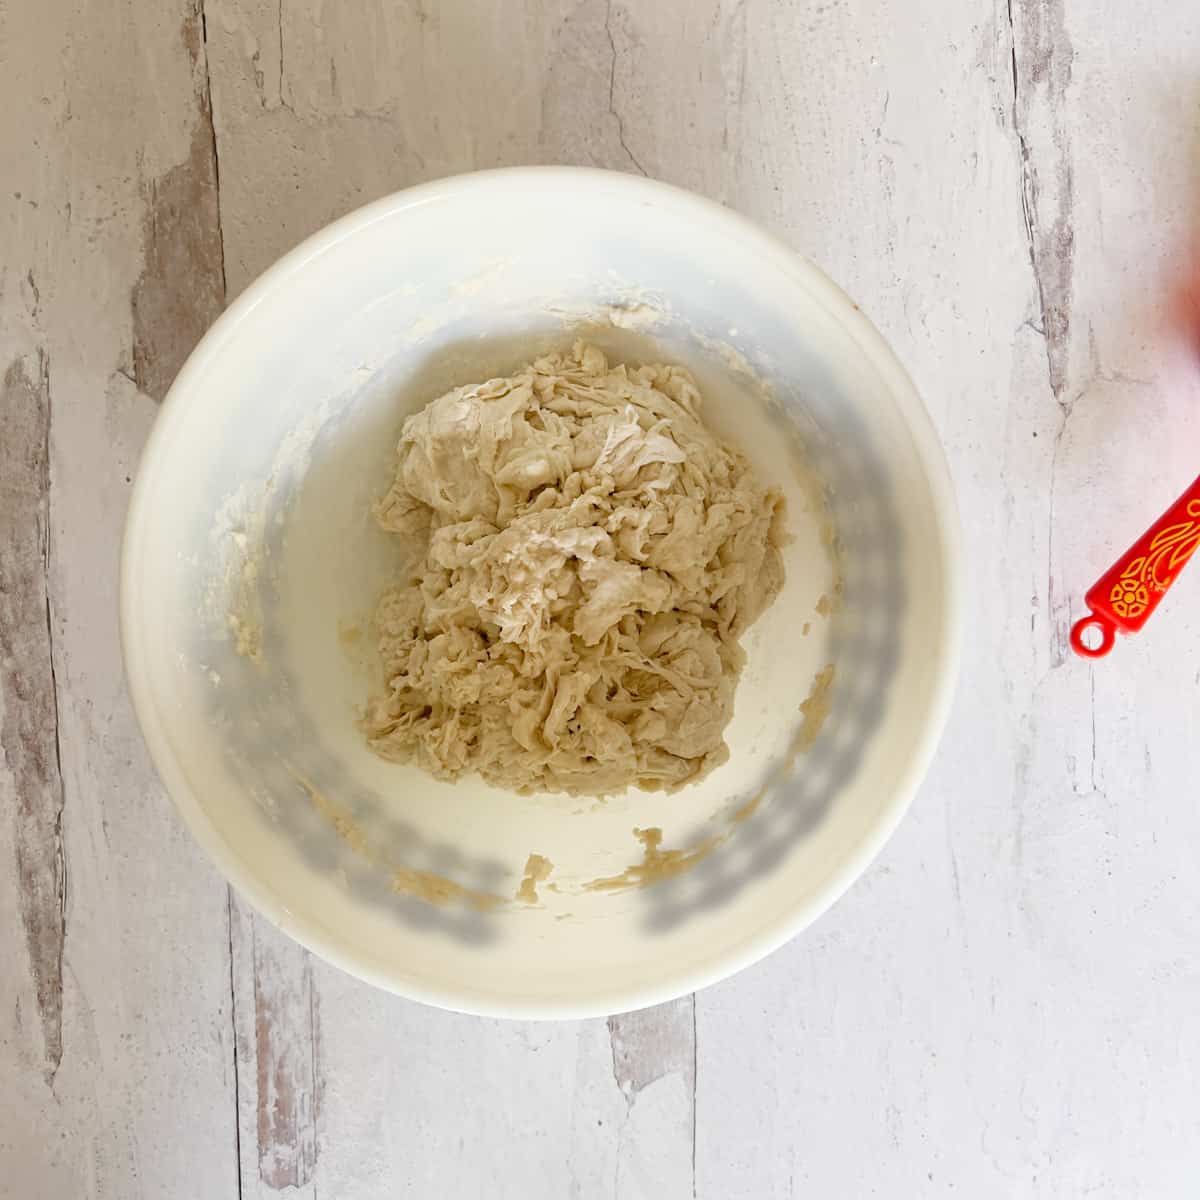
Step 2: Stir in the water to form a sticky dough. Cover the bowl with plastic wrap and leave it undisturbed at room temperature for one hour for the first dough rise.
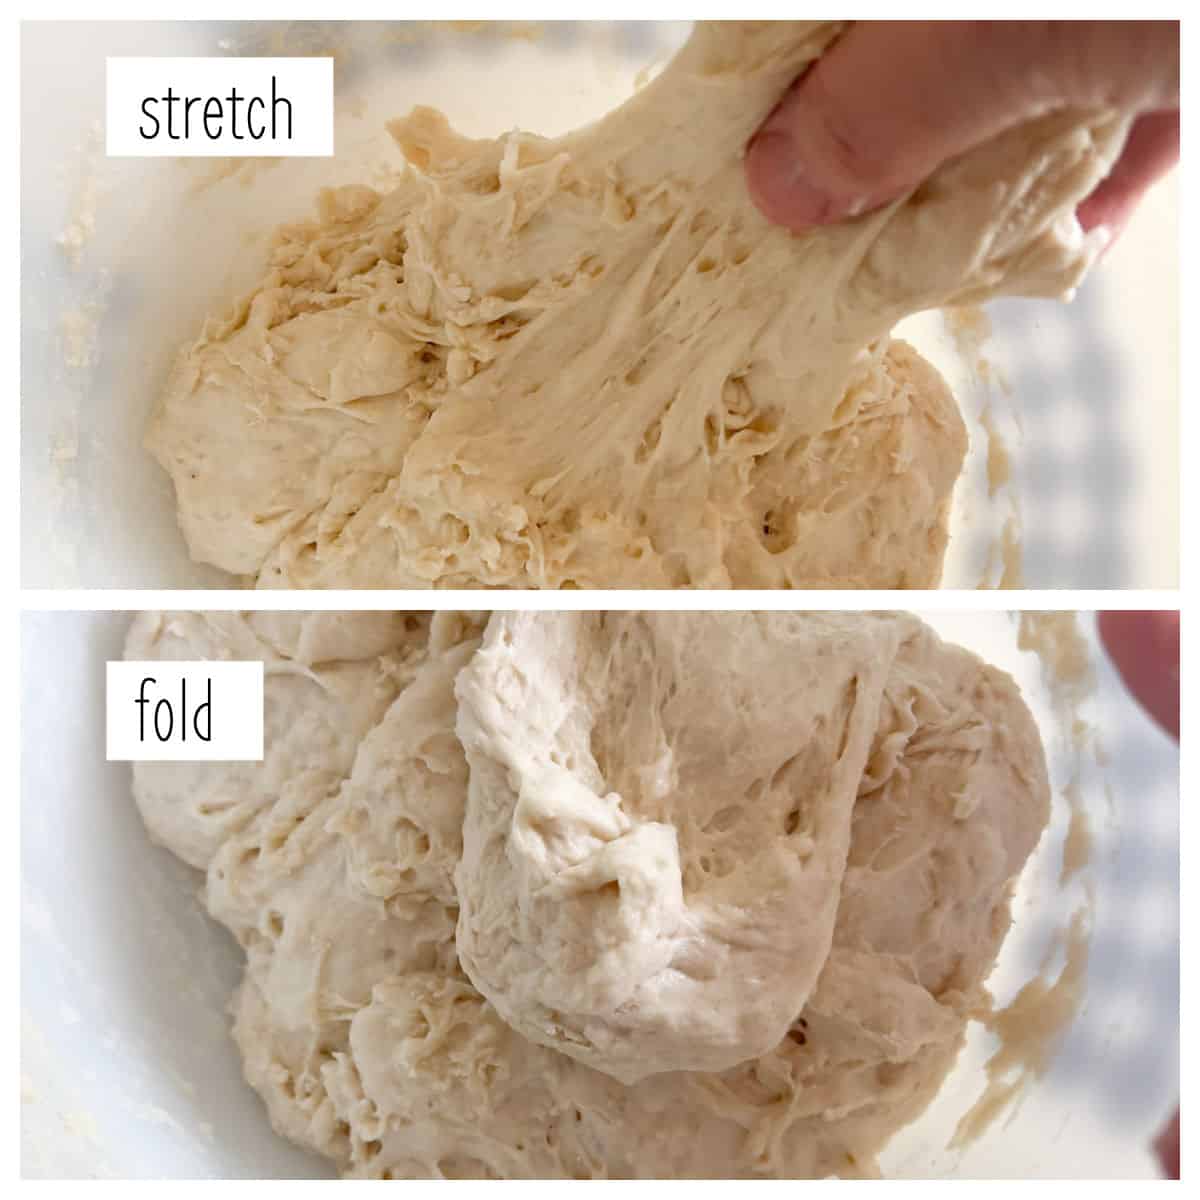
Step 3: Dampen your hands with a little water and stretch and fold the dough in the bowl. Bring each edge towards the middle. Cover the dough with plastic wrap once more and let it relax for 30 minutes. Repeat the above process two more times, letting it rest for 30 minutes each time, for a total of 90 minutes. At this point, the dough will have doubled in size.

Step 4: Gently transfer the dough to a floured work surface; the dough ball will still be sticky. Dust with more flour and gently shape it into a rectangular shape by gently pulling from underneath. Do NOT press the dough
Tip: When adding in extras, I prefer to add those in after the first rise for more control over their distribution.

Step 5: Use a dough cutter or bench scraper to cut and divide the dough log into 4 evenly sized sections.
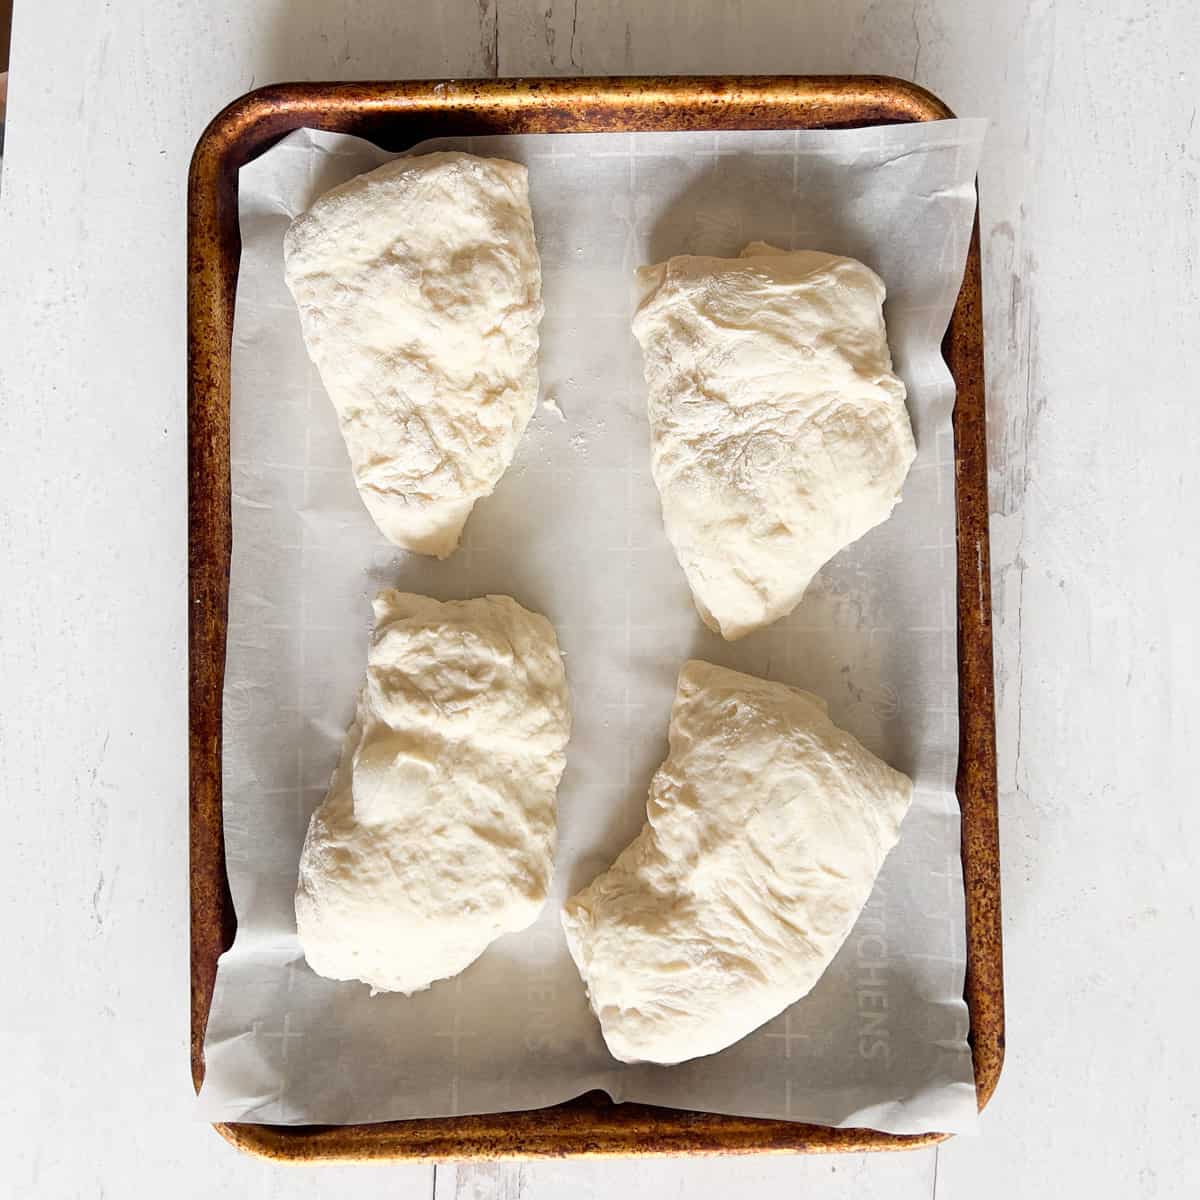
Step 6: Transfer them onto a parchment-lined baking sheet. Arrange a gap between them. Allow dough to rest for roughly 40 minutes in the final proofing phase.
Step 7: Place a water-filled baking dish or ramekin on the bottom rack of your oven. Preheat your oven to 420 degrees F, allowing it to fill with steam from the water. Once preheated, immediately put the baking tray inside and spritz water over the dough. Bake for 20 minutes.
Important Recipe Notes
- Work the dough gently; you don’t want to press out the air inside the dough.
- Make sure to steam up the oven before adding in the ciabatta dough.
- When the rolls come out of the oven, the crust will seem hard, don’t panic; they soften up during cooling.
- Use an instant-read thermometer to test the internal temperature to ensure it’s fully baked. After waiting 3 hours to get it into the oven, you don’t want undercooked dough! The temperature should be around 200-210 degrees Fahrenheit (93-99 degrees Celsius). Don’t go by looks because the bread’s exterior can be golden brown but the inside could still be undercooked.
How to Store the Bread
Homemade bread doesn’t contain preservatives like store-bought versions, so it won’t last as long. Enjoy your homemade ciabatta rolls while they’re fresh for the best flavor and texture.
- Cool Down: Let the ciabatta rolls cool completely on a wire rack before storing.
- Room Temperature: If you plan on eating the ciabatta rolls within a couple of days, store them in a linen or paper bag. This helps maintain the crust’s crispness. Avoid storing them in a plastic bag, which can make the crust soft and chewy.
- Freezing: If you want to keep the rolls for longer, they can be frozen for up to 2 months. Wrap each roll individually in plastic wrap, then put them in a zip-top bag or airtight container. Thaw the frozen ciabatta at room temperature when you’re ready to eat them. For a fresher taste, you can also reheat the thawed rolls in an oven at around 350 degrees Fahrenheit (175 degrees Celsius) for a few minutes.
Recipe FAQs
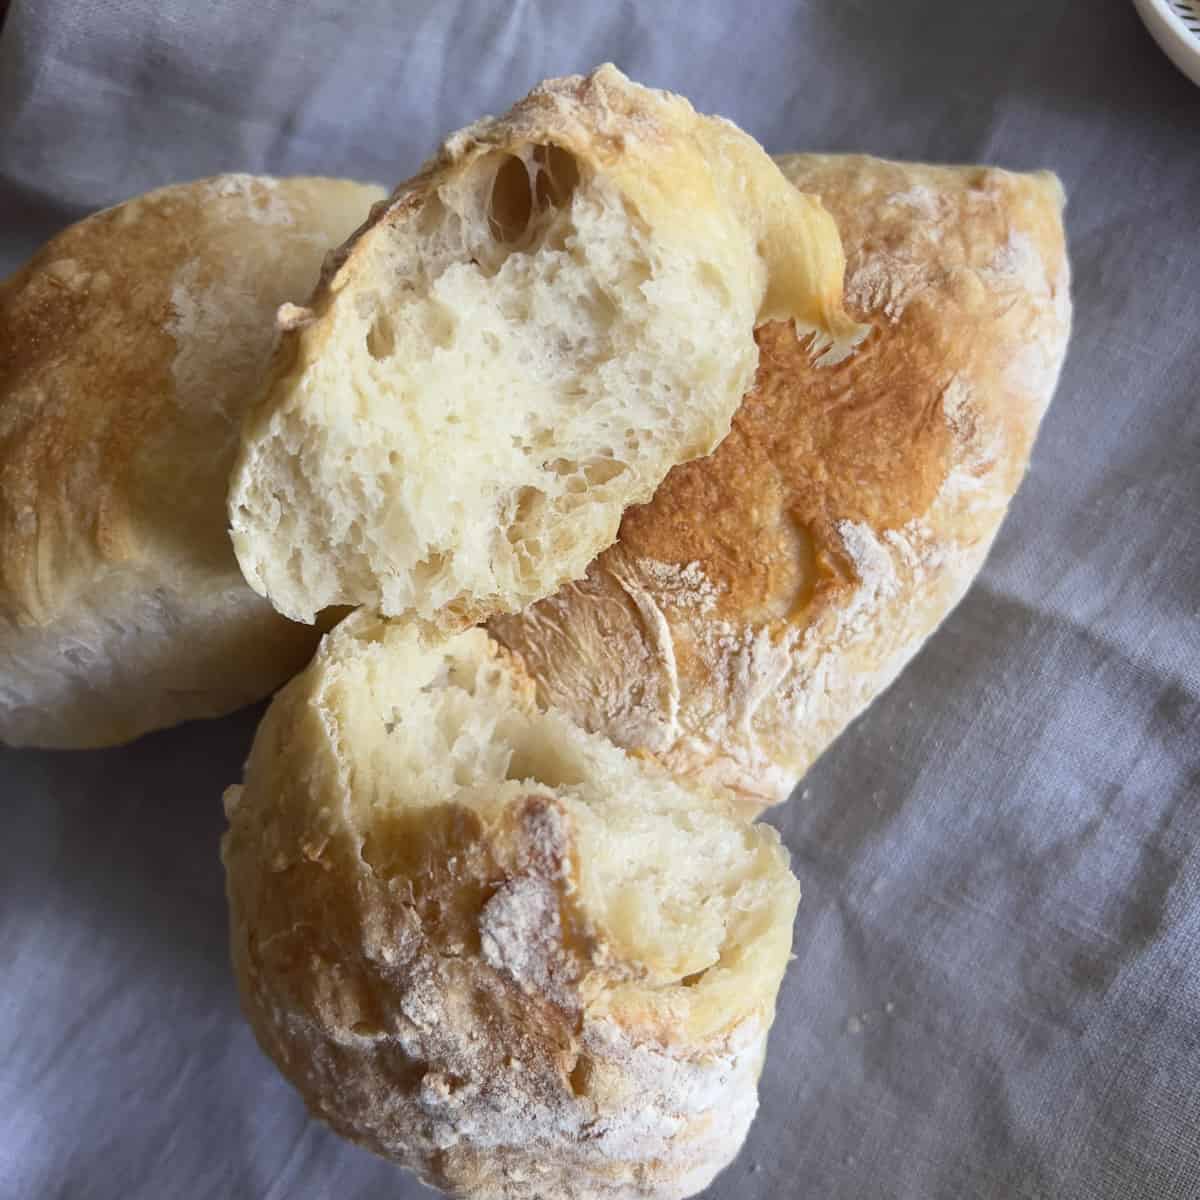
Ciabatta rolls have a crispy, chewy crust and a very open, airy crumb (the inside of the bread). This structure results from the high hydration and long fermentation of the dough.
Dinner Rolls tend to have a soft, tender crust and a fine, evenly distributed crumb. They are often served warm and have a more buttery, rich flavor.
Applying water to the loaf during the baking process, either by brushing or spraying, results in a crust that is crunchy and crispy. The presence of water hinders the formation of the dough skin into a crust, allowing the dough to enlarge. Additionally, it gives the crust a smoother look.
The internal temperature of a fully baked ciabatta roll should be around 200-210 degrees Fahrenheit (93-99 degrees Celsius). Use an instant-read thermometer to ensure the bread is properly baked.
Did you make this recipe? I would love it if you left a comment or review! Be sure to sign up for the email list and follow “A Weekend Cook” on Pinterest and my Facebook page.
-
-
- Cool Down: Let the ciabatta rolls cool completely on a wire rack before storing.Room Temperature: If you plan on eating the ciabatta rolls within a couple of days, store them at room temperature in a linen or paper bag, which helps to maintain the crust’s crispness. Avoid storing in a plastic bag, as this can make the crust soft and chewy.Freezing: If you want to keep the rolls for longer, they can be frozen for up to 2 months. Wrap each roll individually in plastic wrap, then put them in a zip-top bag or airtight container. Thaw the frozen ciabatta at room temperature when you’re ready to eat them. For a fresher taste, you can also reheat the thawed rolls in an oven at around 350 degrees Fahrenheit (175 degrees Celsius) for a few minutes.
-
Recipe FAQs
Ciabatta rolls have a crispy, chewy crust and a very open, airy crumb (the inside of the bread). This structure results from the high hydration and long fermentation of the dough.
Dinner Rolls tend to have a soft, tender crust and a fine, evenly distributed crumb. They are often served warm and have a more buttery, rich flavor.
Applying water to the loaf during the baking process, either by brushing or spraying, results in a crust that is crunchy and crispy. The presence of water hinders the formation of the dough skin into a crust, allowing the dough to enlarge. Additionally, it gives the crust a smoother look.
The internal temperature of a fully baked ciabatta roll should be around 200-210 degrees Fahrenheit (93-99 degrees Celsius). Use an instant-read thermometer to ensure the bread is properly baked.
Small Batch Ciabatta Rolls
Ingredients
Recipe Directions
- In a medium bowl mix the flour, salt and instant dried yeast.
- Stir in the water to form a sticky dough. Cover the bowl with plastic wrap annd leave it undisturbed at room temperature for one hour.
- Dampen your hands with a little bit of water and begin to stretch and fold the dough in the bowl. Bring each edge towards the middle. Cover the dough with plastic wrap once more and let it relax for 30 minutes. Repeat the above process rwo more times , letting it rest for 30 minutes each time for a total of 90 minutes. At this point the dough will have doubled in size.
- Gently transfer the dough to a floured surface, the dough will still be a little sticky.Dust with a bit more flour and gently shape it into a rectangular shape by gently pulling from underneath. Do NOT press the dough.
- Divide the log into 2 evenly sized sections, placing them on a parchment lined baking sheetwith at least a 2-inch gap between them. Allow them to rest for roughly 40 minutes in the final proofing phase.
- Place a water-filled baking dish at the bottom of your oven. Preheat your oven to 420 F, allowing it to fill with steam generated by the water. Once preheated, put the baking tray inside and spritz water over the dough right away. Bake for 20 minutes.
- Cool bread for about 20 minutes.
Would you like to save this recipe?
Nutrition
Notes
Your Private Recipe Notes
How to Store the Bread
Homemade bread doesn’t contain preservatives like store-bought versions, so it won’t last as long. Enjoy your homemade ciabatta rolls while they’re fresh for the best flavor and texture.
-
-
- Cool Down: Let the ciabatta rolls cool completely on a wire rack before storing.Room Temperature: If you plan on eating the ciabatta rolls within a couple of days, store them at room temperature in a linen or paper bag, which helps to maintain the crust’s crispness. Avoid storing in a plastic bag, as this can make the crust soft and chewy.Freezing: If you want to keep the rolls for longer, they can be frozen for up to 2 months. Wrap each roll individually in plastic wrap, then put them in a zip-top bag or airtight container. Thaw the frozen ciabatta at room temperature when you’re ready to eat them. For a fresher taste, you can also reheat the thawed rolls in an oven at around 350 degrees Fahrenheit (175 degrees Celsius) for a few minutes.
-
Recipe FAQs
Ciabatta rolls have a crispy, chewy crust and a very open, airy crumb (the inside of the bread). This structure results from the high hydration and long fermentation of the dough.
Dinner Rolls tend to have a soft, tender crust and a fine, evenly distributed crumb. They are often served warm and have a more buttery, rich flavor.
Applying water to the loaf during the baking process, either by brushing or spraying, results in a crust that is crunchy and crispy. The presence of water hinders the formation of the dough skin into a crust, allowing the dough to enlarge. Additionally, it gives the crust a smoother look.
The internal temperature of a fully baked ciabatta roll should be around 200-210 degrees Fahrenheit (93-99 degrees Celsius). Use an instant-read thermometer to ensure the bread is properly baked.
Small Batch Ciabatta Rolls
Ingredients
Recipe Directions
- In a medium bowl mix the flour, salt and instant dried yeast.
- Stir in the water to form a sticky dough. Cover the bowl with plastic wrap annd leave it undisturbed at room temperature for one hour.
- Dampen your hands with a little bit of water and begin to stretch and fold the dough in the bowl. Bring each edge towards the middle. Cover the dough with plastic wrap once more and let it relax for 30 minutes. Repeat the above process rwo more times , letting it rest for 30 minutes each time for a total of 90 minutes. At this point the dough will have doubled in size.
- Gently transfer the dough to a floured surface, the dough will still be a little sticky.Dust with a bit more flour and gently shape it into a rectangular shape by gently pulling from underneath. Do NOT press the dough.
- Divide the log into 2 evenly sized sections, placing them on a parchment lined baking sheetwith at least a 2-inch gap between them. Allow them to rest for roughly 40 minutes in the final proofing phase.
- Place a water-filled baking dish at the bottom of your oven. Preheat your oven to 420 F, allowing it to fill with steam generated by the water. Once preheated, put the baking tray inside and spritz water over the dough right away. Bake for 20 minutes.
- Cool bread for about 20 minutes.
Would you like to save this recipe?
Nutrition
Notes
Your Private Recipe Notes
-
- Flour: I’ve only made this recipe with Bread flour with a higher protein content. If you use all-purpose flour for rustic bread like ciabatta, you might miss the extra chewiness from the bread flour.
-
-
- Flour: I’ve only made this recipe with Bread flour with a higher protein content. If you use all-purpose flour for rustic bread like ciabatta, you might miss the extra chewiness from the bread flour.
-
-
-
- Salt: I’ve used kosher salt and regular table salt, and both worked fine.
-
-
-
- Yeast: This recipe calls for instant dried yeast. Instant yeast does not need proofing and is very easy to work with.
-
Ciabatta Recipe Variations
When adding additional ingredients to your dough, ensure they’re evenly distributed for the best result.Garlic and Rosemary Ciabatta Rolls: Before baking the rolls, brush the tops with a mixture of melted butter, minced garlic, and chopped rosemary. The flavor will bake into the rolls, creating a savory delight.
Sundried Tomato and Olive Ciabatta Rolls: Add chopped sundried tomatoes and Kalamata olives to the dough for a Mediterranean twist. This is my favorite and I make these when cooking up my slow cooker version of Marinara sauce.
-
-
- Cheese Ciabatta Rolls: Add shredded cheese such as sharp cheddar or gruyere to the dough. You can also sprinkle some on top of the rolls before baking.
-
-
-
- Herb Ciabatta Rolls: Add a mix of your favorite chopped fresh herbs such as thyme, parsley, and oregano to the dough. This works especially well with olive oil-infused dough.
-
-
-
- Onion Ciabatta Rolls: Sauté onions until caramelized and add them to your dough for a sweet and savory spin.
-
When adding extras to ciabatta dough, they are usually incorporated during the initial mixing stage or after the first rise, when the dough is folded.
Recipe Directions
Step 1: In a medium bowl, mix the flour, salt, and instant dried yeast. A dough whisk works well to mix the ingredients evenly.
Step 2: Stir in the water to form a sticky dough. Cover the bowl with plastic wrap and leave it undisturbed at room temperature for one hour.
Step 3: Dampen your hands with a little water and stretch and fold the dough in the bowl. Bring each edge towards the middle. Cover the dough with plastic wrap once more and let it relax for 30 minutes. Repeat the above process two more times, letting it rest for 30 minutes each time, for a total of 90 minutes. At this point, the dough will have doubled in size.
Step 4: Gently transfer the dough to a floured surface; the dough will still be sticky. Dust with more flour and gently shape it into a rectangular shape by gently pulling from underneath. Do NOT press the dough.
Tip: When adding in extras, I prefer to add those in after the first rise for more control over their distribution.
Step 5: Use a dough cutter to cut and divide the dough log into 4 evenly sized sections.
Step 6: Transfer them onto a parchment-lined baking sheet. Arrange a gap between them. Allow dough to rest for roughly 40 minutes in the final proofing phase.
Step 7: Place a water-filled baking dish or ramekin on the bottom rack of your oven. Preheat your oven to 420 degrees F, allowing it to fill with steam from the water. Once preheated, immediately put the baking tray inside and spritz water over the dough. Bake for 20 minutes.
-
-
- Work the dough gently; you don’t want to press out the air inside the dough.
- Make sure to steam up the oven before adding in the ciabatta dough.
- When the rolls come out of the oven, the crust will seem hard, don’t panic; they soften up during cooling.
- Use an instant-read thermometer to test the internal temperature to ensure it’s fully baked. After waiting 3 hours to get it into the oven, you don’t want undercooked dough! The temperature should be around 200-210 degrees Fahrenheit (93-99 degrees Celsius). Don’t go by looks because the bread’s exterior can be nice and browned, but the inside could still be undercooked.
-
How to Store the Bread
Homemade bread doesn’t contain preservatives like store-bought versions, so it won’t last as long. Enjoy your homemade ciabatta rolls while they’re fresh for the best flavor and texture.
-
-
- Cool Down: Let the ciabatta rolls cool completely on a wire rack before storing.Room Temperature: If you plan on eating the ciabatta rolls within a couple of days, store them at room temperature in a linen or paper bag, which helps to maintain the crust’s crispness. Avoid storing in a plastic bag, as this can make the crust soft and chewy.Freezing: If you want to keep the rolls for longer, they can be frozen for up to 2 months. Wrap each roll individually in plastic wrap, then put them in a zip-top bag or airtight container. Thaw the frozen ciabatta at room temperature when you’re ready to eat them. For a fresher taste, you can also reheat the thawed rolls in an oven at around 350 degrees Fahrenheit (175 degrees Celsius) for a few minutes.
-
Recipe FAQs
Ciabatta rolls have a crispy, chewy crust and a very open, airy crumb (the inside of the bread). This structure results from the high hydration and long fermentation of the dough.
Dinner Rolls tend to have a soft, tender crust and a fine, evenly distributed crumb. They are often served warm and have a more buttery, rich flavor.
Applying water to the loaf during the baking process, either by brushing or spraying, results in a crust that is crunchy and crispy. The presence of water hinders the formation of the dough skin into a crust, allowing the dough to enlarge. Additionally, it gives the crust a smoother look.
The internal temperature of a fully baked ciabatta roll should be around 200-210 degrees Fahrenheit (93-99 degrees Celsius). Use an instant-read thermometer to ensure the bread is properly baked.
Small Batch Ciabatta Rolls
Ingredients
Recipe Directions
- In a medium bowl mix the flour, salt and instant dried yeast.
- Stir in the water to form a sticky dough. Cover the bowl with plastic wrap annd leave it undisturbed at room temperature for one hour.
- Dampen your hands with a little bit of water and begin to stretch and fold the dough in the bowl. Bring each edge towards the middle. Cover the dough with plastic wrap once more and let it relax for 30 minutes. Repeat the above process rwo more times , letting it rest for 30 minutes each time for a total of 90 minutes. At this point the dough will have doubled in size.
- Gently transfer the dough to a floured surface, the dough will still be a little sticky.Dust with a bit more flour and gently shape it into a rectangular shape by gently pulling from underneath. Do NOT press the dough.
- Divide the log into 2 evenly sized sections, placing them on a parchment lined baking sheetwith at least a 2-inch gap between them. Allow them to rest for roughly 40 minutes in the final proofing phase.
- Place a water-filled baking dish at the bottom of your oven. Preheat your oven to 420 F, allowing it to fill with steam generated by the water. Once preheated, put the baking tray inside and spritz water over the dough right away. Bake for 20 minutes.
- Cool bread for about 20 minutes.
Would you like to save this recipe?
Nutrition
Notes
Your Private Recipe Notes
-
- Flour: I’ve only made this recipe with Bread flour with a higher protein content. If you use all-purpose flour for rustic bread like ciabatta, you might miss the extra chewiness from the bread flour.
-
-
- Flour: I’ve only made this recipe with Bread flour with a higher protein content. If you use all-purpose flour for rustic bread like ciabatta, you might miss the extra chewiness from the bread flour.
-
-
-
- Salt: I’ve used kosher salt and regular table salt, and both worked fine.
-
-
-
- Yeast: This recipe calls for instant dried yeast. Instant yeast does not need proofing and is very easy to work with.
-
Ciabatta Recipe Variations
When adding additional ingredients to your dough, ensure they’re evenly distributed for the best result.Garlic and Rosemary Ciabatta Rolls: Before baking the rolls, brush the tops with a mixture of melted butter, minced garlic, and chopped rosemary. The flavor will bake into the rolls, creating a savory delight.
Sundried Tomato and Olive Ciabatta Rolls: Add chopped sundried tomatoes and Kalamata olives to the dough for a Mediterranean twist. This is my favorite and I make these when cooking up my slow cooker version of Marinara sauce.
-
-
- Cheese Ciabatta Rolls: Add shredded cheese such as sharp cheddar or gruyere to the dough. You can also sprinkle some on top of the rolls before baking.
-
-
-
- Herb Ciabatta Rolls: Add a mix of your favorite chopped fresh herbs such as thyme, parsley, and oregano to the dough. This works especially well with olive oil-infused dough.
-
-
-
- Onion Ciabatta Rolls: Sauté onions until caramelized and add them to your dough for a sweet and savory spin.
-
When adding extras to ciabatta dough, they are usually incorporated during the initial mixing stage or after the first rise, when the dough is folded.
Recipe Directions
Step 1: In a medium bowl, mix the flour, salt, and instant dried yeast. A dough whisk works well to mix the ingredients evenly.
Step 2: Stir in the water to form a sticky dough. Cover the bowl with plastic wrap and leave it undisturbed at room temperature for one hour.
Step 3: Dampen your hands with a little water and stretch and fold the dough in the bowl. Bring each edge towards the middle. Cover the dough with plastic wrap once more and let it relax for 30 minutes. Repeat the above process two more times, letting it rest for 30 minutes each time, for a total of 90 minutes. At this point, the dough will have doubled in size.
Step 4: Gently transfer the dough to a floured surface; the dough will still be sticky. Dust with more flour and gently shape it into a rectangular shape by gently pulling from underneath. Do NOT press the dough.
Tip: When adding in extras, I prefer to add those in after the first rise for more control over their distribution.
Step 5: Use a dough cutter to cut and divide the dough log into 4 evenly sized sections.
Step 6: Transfer them onto a parchment-lined baking sheet. Arrange a gap between them. Allow dough to rest for roughly 40 minutes in the final proofing phase.
Step 7: Place a water-filled baking dish or ramekin on the bottom rack of your oven. Preheat your oven to 420 degrees F, allowing it to fill with steam from the water. Once preheated, immediately put the baking tray inside and spritz water over the dough. Bake for 20 minutes.
-
-
- Work the dough gently; you don’t want to press out the air inside the dough.
- Make sure to steam up the oven before adding in the ciabatta dough.
- When the rolls come out of the oven, the crust will seem hard, don’t panic; they soften up during cooling.
- Use an instant-read thermometer to test the internal temperature to ensure it’s fully baked. After waiting 3 hours to get it into the oven, you don’t want undercooked dough! The temperature should be around 200-210 degrees Fahrenheit (93-99 degrees Celsius). Don’t go by looks because the bread’s exterior can be nice and browned, but the inside could still be undercooked.
-
How to Store the Bread
Homemade bread doesn’t contain preservatives like store-bought versions, so it won’t last as long. Enjoy your homemade ciabatta rolls while they’re fresh for the best flavor and texture.
-
-
- Cool Down: Let the ciabatta rolls cool completely on a wire rack before storing.Room Temperature: If you plan on eating the ciabatta rolls within a couple of days, store them at room temperature in a linen or paper bag, which helps to maintain the crust’s crispness. Avoid storing in a plastic bag, as this can make the crust soft and chewy.Freezing: If you want to keep the rolls for longer, they can be frozen for up to 2 months. Wrap each roll individually in plastic wrap, then put them in a zip-top bag or airtight container. Thaw the frozen ciabatta at room temperature when you’re ready to eat them. For a fresher taste, you can also reheat the thawed rolls in an oven at around 350 degrees Fahrenheit (175 degrees Celsius) for a few minutes.
-
Recipe FAQs
Ciabatta rolls have a crispy, chewy crust and a very open, airy crumb (the inside of the bread). This structure results from the high hydration and long fermentation of the dough.
Dinner Rolls tend to have a soft, tender crust and a fine, evenly distributed crumb. They are often served warm and have a more buttery, rich flavor.
Applying water to the loaf during the baking process, either by brushing or spraying, results in a crust that is crunchy and crispy. The presence of water hinders the formation of the dough skin into a crust, allowing the dough to enlarge. Additionally, it gives the crust a smoother look.
The internal temperature of a fully baked ciabatta roll should be around 200-210 degrees Fahrenheit (93-99 degrees Celsius). Use an instant-read thermometer to ensure the bread is properly baked.
Small Batch Ciabatta Rolls
Ingredients
Recipe Directions
- In a medium bowl mix the flour, salt and instant dried yeast.
- Stir in the water to form a sticky dough. Cover the bowl with plastic wrap annd leave it undisturbed at room temperature for one hour.
- Dampen your hands with a little bit of water and begin to stretch and fold the dough in the bowl. Bring each edge towards the middle. Cover the dough with plastic wrap once more and let it relax for 30 minutes. Repeat the above process rwo more times , letting it rest for 30 minutes each time for a total of 90 minutes. At this point the dough will have doubled in size.
- Gently transfer the dough to a floured surface, the dough will still be a little sticky.Dust with a bit more flour and gently shape it into a rectangular shape by gently pulling from underneath. Do NOT press the dough.
- Divide the log into 2 evenly sized sections, placing them on a parchment lined baking sheetwith at least a 2-inch gap between them. Allow them to rest for roughly 40 minutes in the final proofing phase.
- Place a water-filled baking dish at the bottom of your oven. Preheat your oven to 420 F, allowing it to fill with steam generated by the water. Once preheated, put the baking tray inside and spritz water over the dough right away. Bake for 20 minutes.
- Cool bread for about 20 minutes.
Would you like to save this recipe?
Nutrition
Notes
Your Private Recipe Notes
-
- Flour: I’ve only made this recipe with Bread flour with a higher protein content. If you use all-purpose flour for rustic bread like ciabatta, you might miss the extra chewiness from the bread flour.
-
-
- Flour: I’ve only made this recipe with Bread flour with a higher protein content. If you use all-purpose flour for rustic bread like ciabatta, you might miss the extra chewiness from the bread flour.
-
-
-
- Salt: I’ve used kosher salt and regular table salt, and both worked fine.
-
-
-
- Yeast: This recipe calls for instant dried yeast. Instant yeast does not need proofing and is very easy to work with.
-
Ciabatta Recipe Variations
When adding additional ingredients to your dough, ensure they’re evenly distributed for the best result.Garlic and Rosemary Ciabatta Rolls: Before baking the rolls, brush the tops with a mixture of melted butter, minced garlic, and chopped rosemary. The flavor will bake into the rolls, creating a savory delight.
Sundried Tomato and Olive Ciabatta Rolls: Add chopped sundried tomatoes and Kalamata olives to the dough for a Mediterranean twist. This is my favorite and I make these when cooking up my slow cooker version of Marinara sauce.
-
-
- Cheese Ciabatta Rolls: Add shredded cheese such as sharp cheddar or gruyere to the dough. You can also sprinkle some on top of the rolls before baking.
-
-
-
- Herb Ciabatta Rolls: Add a mix of your favorite chopped fresh herbs such as thyme, parsley, and oregano to the dough. This works especially well with olive oil-infused dough.
-
-
-
- Onion Ciabatta Rolls: Sauté onions until caramelized and add them to your dough for a sweet and savory spin.
-
When adding extras to ciabatta dough, they are usually incorporated during the initial mixing stage or after the first rise, when the dough is folded.
Recipe Directions
Step 1: In a medium bowl, mix the flour, salt, and instant dried yeast. A dough whisk works well to mix the ingredients evenly.
Step 2: Stir in the water to form a sticky dough. Cover the bowl with plastic wrap and leave it undisturbed at room temperature for one hour.
Step 3: Dampen your hands with a little water and stretch and fold the dough in the bowl. Bring each edge towards the middle. Cover the dough with plastic wrap once more and let it relax for 30 minutes. Repeat the above process two more times, letting it rest for 30 minutes each time, for a total of 90 minutes. At this point, the dough will have doubled in size.
Step 4: Gently transfer the dough to a floured surface; the dough will still be sticky. Dust with more flour and gently shape it into a rectangular shape by gently pulling from underneath. Do NOT press the dough.
Tip: When adding in extras, I prefer to add those in after the first rise for more control over their distribution.
Step 5: Use a dough cutter to cut and divide the dough log into 4 evenly sized sections.
Step 6: Transfer them onto a parchment-lined baking sheet. Arrange a gap between them. Allow dough to rest for roughly 40 minutes in the final proofing phase.
Step 7: Place a water-filled baking dish or ramekin on the bottom rack of your oven. Preheat your oven to 420 degrees F, allowing it to fill with steam from the water. Once preheated, immediately put the baking tray inside and spritz water over the dough. Bake for 20 minutes.
-
-
- Work the dough gently; you don’t want to press out the air inside the dough.
- Make sure to steam up the oven before adding in the ciabatta dough.
- When the rolls come out of the oven, the crust will seem hard, don’t panic; they soften up during cooling.
- Use an instant-read thermometer to test the internal temperature to ensure it’s fully baked. After waiting 3 hours to get it into the oven, you don’t want undercooked dough! The temperature should be around 200-210 degrees Fahrenheit (93-99 degrees Celsius). Don’t go by looks because the bread’s exterior can be nice and browned, but the inside could still be undercooked.
-
How to Store the Bread
Homemade bread doesn’t contain preservatives like store-bought versions, so it won’t last as long. Enjoy your homemade ciabatta rolls while they’re fresh for the best flavor and texture.
-
-
- Cool Down: Let the ciabatta rolls cool completely on a wire rack before storing.Room Temperature: If you plan on eating the ciabatta rolls within a couple of days, store them at room temperature in a linen or paper bag, which helps to maintain the crust’s crispness. Avoid storing in a plastic bag, as this can make the crust soft and chewy.Freezing: If you want to keep the rolls for longer, they can be frozen for up to 2 months. Wrap each roll individually in plastic wrap, then put them in a zip-top bag or airtight container. Thaw the frozen ciabatta at room temperature when you’re ready to eat them. For a fresher taste, you can also reheat the thawed rolls in an oven at around 350 degrees Fahrenheit (175 degrees Celsius) for a few minutes.
-
Recipe FAQs
Ciabatta rolls have a crispy, chewy crust and a very open, airy crumb (the inside of the bread). This structure results from the high hydration and long fermentation of the dough.
Dinner Rolls tend to have a soft, tender crust and a fine, evenly distributed crumb. They are often served warm and have a more buttery, rich flavor.
Applying water to the loaf during the baking process, either by brushing or spraying, results in a crust that is crunchy and crispy. The presence of water hinders the formation of the dough skin into a crust, allowing the dough to enlarge. Additionally, it gives the crust a smoother look.
The internal temperature of a fully baked ciabatta roll should be around 200-210 degrees Fahrenheit (93-99 degrees Celsius). Use an instant-read thermometer to ensure the bread is properly baked.
Small Batch Ciabatta Rolls
Ingredients
Recipe Directions
- In a medium bowl mix the flour, salt and instant dried yeast.
- Stir in the water to form a sticky dough. Cover the bowl with plastic wrap annd leave it undisturbed at room temperature for one hour.
- Dampen your hands with a little bit of water and begin to stretch and fold the dough in the bowl. Bring each edge towards the middle. Cover the dough with plastic wrap once more and let it relax for 30 minutes. Repeat the above process rwo more times , letting it rest for 30 minutes each time for a total of 90 minutes. At this point the dough will have doubled in size.
- Gently transfer the dough to a floured surface, the dough will still be a little sticky.Dust with a bit more flour and gently shape it into a rectangular shape by gently pulling from underneath. Do NOT press the dough.
- Divide the log into 2 evenly sized sections, placing them on a parchment lined baking sheetwith at least a 2-inch gap between them. Allow them to rest for roughly 40 minutes in the final proofing phase.
- Place a water-filled baking dish at the bottom of your oven. Preheat your oven to 420 F, allowing it to fill with steam generated by the water. Once preheated, put the baking tray inside and spritz water over the dough right away. Bake for 20 minutes.
- Cool bread for about 20 minutes.
Would you like to save this recipe?
Nutrition
Notes
Your Private Recipe Notes
-
- Flour: I’ve only made this recipe with Bread flour with a higher protein content. If you use all-purpose flour for rustic bread like ciabatta, you might miss the extra chewiness from the bread flour.
-
-
- Flour: I’ve only made this recipe with Bread flour with a higher protein content. If you use all-purpose flour for rustic bread like ciabatta, you might miss the extra chewiness from the bread flour.
-
-
-
- Salt: I’ve used kosher salt and regular table salt, and both worked fine.
-
-
-
- Yeast: This recipe calls for instant dried yeast. Instant yeast does not need proofing and is very easy to work with.
-
Ciabatta Recipe Variations
When adding additional ingredients to your dough, ensure they’re evenly distributed for the best result.Garlic and Rosemary Ciabatta Rolls: Before baking the rolls, brush the tops with a mixture of melted butter, minced garlic, and chopped rosemary. The flavor will bake into the rolls, creating a savory delight.
Sundried Tomato and Olive Ciabatta Rolls: Add chopped sundried tomatoes and Kalamata olives to the dough for a Mediterranean twist. This is my favorite and I make these when cooking up my slow cooker version of Marinara sauce.
-
-
- Cheese Ciabatta Rolls: Add shredded cheese such as sharp cheddar or gruyere to the dough. You can also sprinkle some on top of the rolls before baking.
-
-
-
- Herb Ciabatta Rolls: Add a mix of your favorite chopped fresh herbs such as thyme, parsley, and oregano to the dough. This works especially well with olive oil-infused dough.
-
-
-
- Onion Ciabatta Rolls: Sauté onions until caramelized and add them to your dough for a sweet and savory spin.
-
When adding extras to ciabatta dough, they are usually incorporated during the initial mixing stage or after the first rise, when the dough is folded.
Recipe Directions
Step 1: In a medium bowl, mix the flour, salt, and instant dried yeast. A dough whisk works well to mix the ingredients evenly.
Step 2: Stir in the water to form a sticky dough. Cover the bowl with plastic wrap and leave it undisturbed at room temperature for one hour.
Step 3: Dampen your hands with a little water and stretch and fold the dough in the bowl. Bring each edge towards the middle. Cover the dough with plastic wrap once more and let it relax for 30 minutes. Repeat the above process two more times, letting it rest for 30 minutes each time, for a total of 90 minutes. At this point, the dough will have doubled in size.
Step 4: Gently transfer the dough to a floured surface; the dough will still be sticky. Dust with more flour and gently shape it into a rectangular shape by gently pulling from underneath. Do NOT press the dough.
Tip: When adding in extras, I prefer to add those in after the first rise for more control over their distribution.
Step 5: Use a dough cutter to cut and divide the dough log into 4 evenly sized sections.
Step 6: Transfer them onto a parchment-lined baking sheet. Arrange a gap between them. Allow dough to rest for roughly 40 minutes in the final proofing phase.
Step 7: Place a water-filled baking dish or ramekin on the bottom rack of your oven. Preheat your oven to 420 degrees F, allowing it to fill with steam from the water. Once preheated, immediately put the baking tray inside and spritz water over the dough. Bake for 20 minutes.
-
-
- Work the dough gently; you don’t want to press out the air inside the dough.
- Make sure to steam up the oven before adding in the ciabatta dough.
- When the rolls come out of the oven, the crust will seem hard, don’t panic; they soften up during cooling.
- Use an instant-read thermometer to test the internal temperature to ensure it’s fully baked. After waiting 3 hours to get it into the oven, you don’t want undercooked dough! The temperature should be around 200-210 degrees Fahrenheit (93-99 degrees Celsius). Don’t go by looks because the bread’s exterior can be nice and browned, but the inside could still be undercooked.
-
How to Store the Bread
Homemade bread doesn’t contain preservatives like store-bought versions, so it won’t last as long. Enjoy your homemade ciabatta rolls while they’re fresh for the best flavor and texture.
-
-
- Cool Down: Let the ciabatta rolls cool completely on a wire rack before storing.Room Temperature: If you plan on eating the ciabatta rolls within a couple of days, store them at room temperature in a linen or paper bag, which helps to maintain the crust’s crispness. Avoid storing in a plastic bag, as this can make the crust soft and chewy.Freezing: If you want to keep the rolls for longer, they can be frozen for up to 2 months. Wrap each roll individually in plastic wrap, then put them in a zip-top bag or airtight container. Thaw the frozen ciabatta at room temperature when you’re ready to eat them. For a fresher taste, you can also reheat the thawed rolls in an oven at around 350 degrees Fahrenheit (175 degrees Celsius) for a few minutes.
-
Recipe FAQs
Ciabatta rolls have a crispy, chewy crust and a very open, airy crumb (the inside of the bread). This structure results from the high hydration and long fermentation of the dough.
Dinner Rolls tend to have a soft, tender crust and a fine, evenly distributed crumb. They are often served warm and have a more buttery, rich flavor.
Applying water to the loaf during the baking process, either by brushing or spraying, results in a crust that is crunchy and crispy. The presence of water hinders the formation of the dough skin into a crust, allowing the dough to enlarge. Additionally, it gives the crust a smoother look.
The internal temperature of a fully baked ciabatta roll should be around 200-210 degrees Fahrenheit (93-99 degrees Celsius). Use an instant-read thermometer to ensure the bread is properly baked.
Small Batch Ciabatta Rolls
Ingredients
Recipe Directions
- In a medium bowl mix the flour, salt and instant dried yeast.
- Stir in the water to form a sticky dough. Cover the bowl with plastic wrap annd leave it undisturbed at room temperature for one hour.
- Dampen your hands with a little bit of water and begin to stretch and fold the dough in the bowl. Bring each edge towards the middle. Cover the dough with plastic wrap once more and let it relax for 30 minutes. Repeat the above process rwo more times , letting it rest for 30 minutes each time for a total of 90 minutes. At this point the dough will have doubled in size.
- Gently transfer the dough to a floured surface, the dough will still be a little sticky.Dust with a bit more flour and gently shape it into a rectangular shape by gently pulling from underneath. Do NOT press the dough.
- Divide the log into 2 evenly sized sections, placing them on a parchment lined baking sheetwith at least a 2-inch gap between them. Allow them to rest for roughly 40 minutes in the final proofing phase.
- Place a water-filled baking dish at the bottom of your oven. Preheat your oven to 420 F, allowing it to fill with steam generated by the water. Once preheated, put the baking tray inside and spritz water over the dough right away. Bake for 20 minutes.
- Cool bread for about 20 minutes.
Would you like to save this recipe?
Nutrition
Notes
Your Private Recipe Notes
Get new recipes by email
Subscribe to get new posts delivered to your inbox.